
Hey beauty lovers! Looking for some makeup tips and tricks? Well, you’ve come to the right place.
Applying makeup can be tricky if you don’t know what you’re doing – but fear not, I’m here to help! This article will provide an introduction to applying makeup, from the basics of tools and products, through step-by-step instructions on creating a stunning look.

Whether you want to begain or improve your skills, this guide has everything you need. Let’s get started!
Prepping Skin For Makeup Application
Cleansing is essential to remove dirt, grime, and oil that can build up on your skin, so it’s important to ensure you do this each day before applying your makeup. Tone afterward to help balance your skin’s pH and give it a healthy glow. Moisturizing is a must – your skin needs hydration to look its best, so don’t forget to give it a good slather of your favorite moisturizer.
Exfoliating is a perfect way to help your makeup go on more smoothly – just make sure you’re not doing it too often, as it can dry out your skin. Primer helps create a smooth base for your makeup and provides SPF protection.
Sunscreen is also a must – use a product that contains SPF 30 or higher for the best protection. Face oils are great for adding a bit of extra hydration – just remember to use a small amount, as you don’t want to leave your skin feeling greasy.
Facial masks can be a wonderful way to give your skin a deep cleanse but ensure you’re using the right one for your skin type. Concealer is great for covering any blemishes or dark circles; the foundation helps to even out your skin tone.
Powder helps to set your makeup, and then you can add a bit of blush, bronzer, and highlighter to define your face. Finally, don’t forget to spritz on some setting spray to help your makeup stay in place!
Choosing The Right Foundation
When choosing the right foundation, knowing your skin type and finding a product that caters to it is important. Next, finding a foundation color that matches your skin tone is critical to avoid any visible lines. Lastly, consider the coverage level you need – do you want something light or more full? With these ideas, you’ll be on your way to finding the perfect foundation.
Skin Type
When choosing the proper foundation, determining your skin type is one of the most important things! Whether you have an oily, dry, or combination, understanding how to recognize and address your unique needs can help ensure a flawless finish.
Oily skin tends to produce more sebum which can lead to breakouts if not appropriately addressed, whereas dry skin requires extra hydration to stay healthy and radiant. It’s all about finding the balance for your complexion – so consult an expert and research before committing to any particular product!
Color Matching
Once you’ve understood your skin type, it’s time to find the perfect shade of foundation!
Color matching is critical when creating a flawless makeup routine that looks natural and effortless – so be sure to test out a few shades on your jawline before committing.
Finding the perfect color that suits your skin tone will help ensure everything blends seamlessly without looking too heavy or cakey.
Remember, it’s about ensuring the foundation enhances rather than masks your complexion!
Coverage Level
Once you’ve found the perfect shade of foundation, it’s time to decide on the coverage level.
Whether you prefer a light, medium or full coverage look is entirely up to you – ensure it matches your skin type and color!
A professional makeup artist may recommend using a sheer layer for an everyday natural look or adding additional layers if you want something more dramatic.
Always use a foundation brush to apply evenly and blend seamlessly – this will help create a flawless finish.
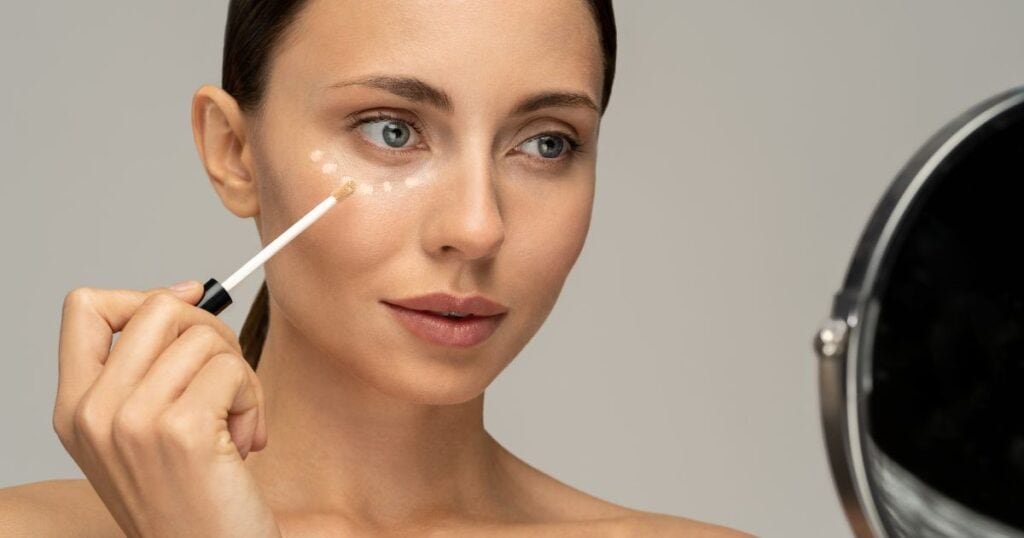
Concealing Techniques
Color correcting is necessary for any makeup look, so let’s start there! You could use a color corrector to neutralize any discoloration on the skin and ensure your foundation looks its best. Blending is critical, too – make sure you take the time to blend your concealer and foundation seamlessly; this will help create a flawless finish. Finally, don’t be afraid to combine products – mixing and matching different formulas can be a great way to customize your makeup look.
Color Correcting
Are you seeking the perfect way to conceal blemishes, dark circles, and other imperfections? Color correcting is an essential concealing technique to help you achieve a flawless look.
You use concealer in shades that match your skin tone to cover any problem areas. Then use a powder foundation to set the makeup in place.
To take it up, you can add color correctors like green and yellow, which will neutralize redness or purple hues for discoloration. This gives you a smooth and even canvas before you apply your favorite blush and highlighter!
Apply these steps confidently–they’ll make you look picture-perfect on any occasion!
Blending
Once you’ve completed the color-correcting steps, it’s time to blend.
Blending is essential for a natural-looking finish and prevents the product from looking cakey or unnatural.
Use feathery strokes with a damp sponge or brush to blend your concealer and foundation all over your face seamlessly.
If you need much more coverage in some areas, apply an extra layer of all-over concealer and repeat the blending process until you achieve the desired result.
With some patience and practice, this technique will give you a luminous complexion without harsh lines!
Combining Products
Now that you’ve mastered the basics of blending, it’s time to move on to combining products. Combining concealer and foundation with other makeup items like eyeliner and mascara can help create a more polished look while keeping your skin natural.
Use an angled brush or small sponge to apply eyeliner as close as possible to the lash line for sharp definition. Later curl your lashes with an eyelash curler and several coats of lengthening mascara for maximum volume and length. Blend them with eyeliner and mascara so that no harsh lines are visible!
With these simple steps, you’ll have perfected your concealing techniques quickly!
Contouring And Highlighting
Choosing the proper contour shades is vital to achieving a natural look when contouring and highlighting. Blend and shade your contours to create depth and structure in your face. Lastly, highlight with illuminators to give your skin a dewy, radiant finish!
Choose The Right Contour Shades
Choosing the proper contour shades is essential to creating a beautiful, natural-looking contour and highlight effect.
As an experienced makeup artist, I always recommend considering your skin tone when selecting shades for highlighting and contouring. For medium to dark complexions, opt for warm browns or tans as a base color; if you have fair skin tones, use lighter beiges as a foundation shade.
If you’re not sure of which one is best for you, try using two shades – one slightly darker than your complexion and another more neutral in hue – to create subtle shadows and highlights on your face.
You can achieve excellent results by playing around with different colors and blending them perfectly!
Blending And Shading
Once you’ve settled on the perfect contour and highlight shades for your skin tone, blending and shading become the key to creating a flawless finished look.
To ensure all colors blend seamlessly together, use an eyeshadow brush or damp makeup sponge – this will help soften any harsh lines and give you a more natural finish.
For extra definition around the brows, try using an eyebrow pencil lightly over the area that has been highlighted; this can also be used to sharpen up mascara application when needed.
With these simple steps in mind, you’ll have gorgeous sculpted cheeks in no time!
Highlighting With Illuminators
Once you’ve mastered the basics of contouring and highlighting, it’s time to take your look up a notch with some illuminators.
Illuminators are light-reflecting makeup products that can be used independently or with a powder highlighter for an even more eye-catching effect.
For example, using a liquid illuminator along your cheekbones before applying powder highlighter adds extra sparkle and glow – perfect for special occasions!
When using this technique, blend well so there aren’t any harsh lines between colors.
You can also use illuminators around your eyes as part of an eye makeup look; just remember to apply sparingly for the best results.
With these tips in mind, you’ll have glowing skin all day!
Perfectly Shaped Brows
Let’s talk about shaping techniques and brow products for perfectly shaped brows! We’ll go over choosing the right brow products and the best techniques for achieving the perfect shape.
Shaping Techniques
Shaping techniques are essential for achieving perfectly shaped brows, and there are many different ways to go about it.
For a natural-looking shape, an eyebrow pencil is great for defining the brow’s arch and helping you fill in any sparse areas.
You can also use eyelash curlers to create lift in the tail of your brows while giving them more definition and volume.
With these simple tools and some practice, anyone can learn how to sculpt their eyebrows into perfection!
So don’t hesitate to experiment with different shapes until you find one that looks perfect on you – after all, beauty is meant to be customized!
Brow Products
Once you’ve got the perfect shape, it’s time to fill in those brows!
Brow pencils and powders give your eyebrows more definition and color. A pencil is ideal for outlining arches or adding extra volume, while powder helps create a natural-looking texture that stays put all day.
With so many shades available, you can easily find a product that blends perfectly with your hair color. Plus, some of these products even come with waterproof formulas – perfect if you sweat or get caught in the rain!
So whether you’re after subtle enhancement or bold statement brows, there’s sure to be an option out there that’ll make your arch envy-worthy.
Eyeshadow Application Tips
Choosing the right shade of eyeshadow is critical to achieving a flattering look. When applying your eyeshadow, blending the colors properly for a seamless finish is essential. Having the right tools and brushes to apply your makeup is essential for the best results!
Choosing The Right Shade
When it comes to eyeshadow, choosing the right shade is essential. After all, the wrong color can make you look overdone or out of place.
First, consider your skin tone when selecting a hue – if you have fair skin, opt for colors on the lighter side; those with deeper skin tones should pick shades from the mid-range and darker spectrum of makeup products.
Remember that your eye color plays an important role, too; warm colors such as oranges and browns tend to enhance blue eyes, while cooler hues like gray and purple bring out greenish undertones in hazel peepers.
Whether you’re looking for subtle shading or something more dramatic, finding the perfect shadow will help create a stunning effect!
Blending Techniques
Once you select the right shade for your eyes, the next step is to think about blending techniques.
For a seamless look, use a fluffy brush and blend in circular motions to create an even finish.
If you want something dramatic, try using darker shades at the outer corners of your eyes and work inwards towards the inner corner.
You can also combine eyeshadow with eyeliner for added definition – just make sure that your eyeliner follows the exact contour of your eye shadow so it doesn’t clash or become too intense.
With these ideas, you are now ready to master the art of creating beautiful makeup looks!
Tools And Brushes
Now that you know about eyeshadow and blending techniques, let’s discuss the tools and brushes you need to get the perfect look.
A good quality makeup brush is essential for any makeup look. Look for one with soft bristles that won’t scratch your delicate eyelids but still provide enough control when applying your eyeshadow.
A makeup sponge is also great for creating an even finish – just remember to dampen it first for a more straightforward application.
With these essential tools, you can create beautiful eye looks!
Eyeliner Techniques
Let’s start by talking about creating a perfect Winged Eyeliner Look. It’s an iconic look that can enhance your eye makeup and pop your eyes! Next, I’ll discuss the best methods to apply eyeliner quickly and efficiently. These tips will help you get your liner on in no time!
Creating A Winged Eyeliner Look
Creating a winged eyeliner look is the perfect way to take your makeup from day to night.
You can achieve an eye-catching style that will turn heads with just a few simple steps!
Start with prepping and priming your lids using eyeshadow primer for added longevity.
Then, use an angled brush and liquid liner to draw a line along the upper lashline, starting at the inner corner of the eye and flicking up toward the tail end.
Ensure not to overdo it by keeping the line thin and close to the lashes.
To ensure each side looks even, connect both ends in one swoop.
Once complete, add some mascara, and you’ll have a stunningly glam look that’s glamorous!
Applying Eyeliner Quickly
If you’re seeking a quick and easy way to apply eyeliner, then the basic technique is perfect.
You have to take your liner brush and draw small strokes along the upper lashline from the inner corner of the eye outwards.
You can start light and gradually build up the intensity as needed – this will help keep your look neat and even on both sides.
When it comes time to finish, just make sure that each stroke overlaps slightly with the previous one so there are no gaps between them!
With practice, you’ll be able to master this technique quickly and easily – giving you effortless yet stunningly beautiful results every time.
Lash Extension And False Lashes
Let’s get started with lash extensions and false lashes! Whether you want to try out extensions, go for a more dramatic look with false lashes, or try out alternatives, I’m here to guide you through all the tips and tricks. Let’s discuss types of lash extensions, false lash application, lash adhesives, lash removal, lash care, and lash alternatives – so you can find the perfect solution for your unique look!
Types Of Lash Extensions
Are you looking to enhance your eyelashes with something more permanent than mascara? Well, look no further! Lash extensions and false lashes are the perfect way to make a statement.
Whether you’re after a glamorous length or subtle flutter, several types of lash extensions are available for everyone. Each type will give you different looks depending on your goal, from individual clusters and classic flares to hybrid mixtures and mega volumes.
With an eyeliner brush or tweezers, you can customize them according to your preference and achieve stunning results every time.
So go ahead and explore your options – long, beautiful lashes await!
False Lash Application
Applying false lashes can seem intimidating, but with a few steps and the right tools, it’s easy to master!
Firstly, you’ll want to pick out your desired lash style – from subtle everyday looks to dramatic volume.
Once ready, grab an eyeliner brush or tweezers and carefully remove the lashes from their tray.
Line up the base of each lash against your natural lash line, ensuring no gaps. Then use your tweezers or brush to press down gently on the corners for maximum hold.
Finally, add extra curl using an eyelash curler before coating it in mascara for a seamless finish.
So don’t be scared – gorgeous falsies await!
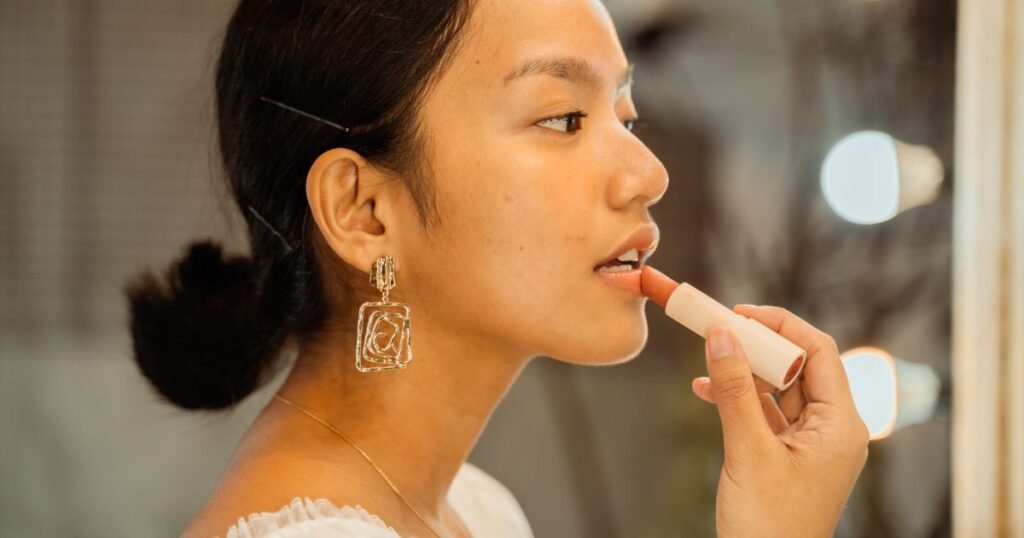
Lipstick Selection And Application
Choosing the perfect shade and applying it correctly can make all the difference in lipstick. Let’s talk about finding the shade that suits you best and applying it to look perfect!
Choosing The Right Lipstick
When it comes to the right lip color, there are a few things you need to keep in mind.
As an expert beauty and makeup artist, I always recommend selecting a lipstick that complements your skin tone and outfit.
You can also use lip liner to define and accentuate the shape of your lips before applying lipstick or gloss for an even better finish.
It’s important to remember when deciding on a shade of lipstick that darker shades tend to make lips appear smaller, while lighter colors create the illusion of fuller lips.
Lastly, don’t forget to blend!
Applying Lipstick Correctly
Once you’ve identified the perfect shade of lipstick for your skin tone and outfit, it’s time to apply.
I recommend a few application techniques to ensure your lip products look their best.
Start by lining your lips using a matching lip liner before applying your chosen lipstick or gloss.
This will help in defining the shape of your lips and provide better color coverage.
Then use light strokes to evenly blend the product from the inner corner towards the outer edges until it’s blended seamlessly into your skin.
For an extra polished finish, press some tissue on top of your lips, then lightly dust translucent powder over them – this helps set everything in place so they last all day!
Making Lipstick Last
When making lipstick last, choosing the right shade for your skin tone is one of the most important things to consider. Another critical step is exfoliating your lips before applying the lipstick, ensuring even coverage and a longer-lasting finish.
Choosing The Right Shade
When making your lipstick last, the first step is choosing the right shade.
You want something that will complement your eyeshadow palette and foundation shade so you can create a beautiful look.
A good rule of thumb while selecting your lipstick color is to go one or two shades lighter than you would typically wear; this will help ensure that it won’t be too dark or intense for everyday use.
When in doubt, try going for a more neutral hue like pink, nude, or peach – these colors are always timeless and flattering on anyone!
Exfoliating Before Applying
Once you’ve chosen the perfect shade for your look, you must ensure your lips are prepped and ready, so the lipstick will last all day.
Exfoliating is key before applying any lip color – this helps remove dead skin cells from the surface of your lips, revealing a smoother canvas for application.
A scrub or an exfoliating cloth with sugar and oil can give you soft and hydrated lips.
Ensure not to overdo it; too much exfoliation can cause irritation, which won’t be good for your skin!
Taking care of your pout by exfoliating regularly can also help keep chapped lips at bay and ensure long-lasting wear when rocking bold colors or mattes.
Blush Application And Blending
Let’s get started with the blush application and blending! First, discuss blush shades, placement, blending techniques, and brushes. I’ll walk you through every step so you can feel confident in your makeup application skills.
Blush Shades
When you’re applying blush, it’s essential to choose the right shade for your skin tone.
There are two types of blushes: powder and cream.
Powder blushes come in shades ranging from light pink to deep coral, while cream blushes usually give a more natural look with their sheer color pigments.
Cream blush is great for those who don’t want an overly made-up look, as it blends easily into the skin without leaving any harsh lines.
When choosing which blush to use, pick one that adds a subtle flush of color to your cheeks – just enough so you can still see your natural glow shine through!
So remember, when picking out the perfect blush shade for you, think about what kind of result you’d like to achieve and go from there!
Blush Placement
Now that you’ve chosen the perfect blush shade for your skin tone, it’s time to move on to placing and blending!
With powder blushes, applying just enough so you don’t get a heavy-handed look is essential. Start by lightly swirling the brush in the product before tapping off any excess – this will help ensure an even application of color.
When applying the blush to your cheeks, start at the apples of your cheeks and blend outward using circular motions until you reach your desired effect. This placement technique helps create a natural flush of color that looks effortless and beautiful.
So there you have it – let yourself shine through with careful blush placement and blending!
Setting Makeup For Long-Lasting Wear
First, primer is essential for creating a base for your makeup – it helps it last longer and look smoother. Foundation’s what comes next, and you can find one to suit your skin type, whether liquid, cream, or powder. To finish, set your foundation with some powder, then add a bit of blush for a natural flush. Setting spray’s a must for ensuring your makeup lasts all day – just spritz it over your face after you’ve finished. Next, concealer’s a great way to hide any blemishes or dark circles you might be self-conscious about. Then, add some bronzer to your cheekbones and temples for definition before adding a bit of eye shadow and mascara. Eyeliner’s a great way to add drama to your look, while lipstick or lip gloss can take it to the next level. Don’t forget eyebrows, contour, and highlighter – they’ll help bring your whole look together!
Primer
When it comes to makeup, a primer is essential for setting your look and ensuring long-lasting wear. This critical step in the makeup application process helps create a smooth canvas for foundation and other products to last all day without fading or settling into fine lines.
Primers come in liquid, cream, powder, and mousse forms depending on your skin type and desired finish. A good primer will also help fill in large pores, minimize discoloration, and blur any imperfections, so be sure to find one that works best for you!
With the suitable primer prepping your face before applying makeup will become second nature.
Foundation
Once you have primed your face for makeup, the next step is applying foundation.
The foundation helps even skin tone and allows other products, such as concealer or blush to blend seamlessly into your natural skin tone.
When choosing a foundation, ensure it matches your shade to get an airbrushed look without any harsh edges.
Also, consider what finish you prefer- matte, dewy, or satin- when selecting your formula.
Once applied correctly with a damp sponge or brush, the foundation creates a smooth base that lasts all day!
Powder
Once you have applied foundation, it’s time to set your makeup for long-lasting wear.
A translucent powder is one of the best ways to do this. This helps lock in foundation and concealer while also helping reduce shine throughout the day.
Depending on the coverage that works best for you, translucent powders are available as loose or pressed formulas.
When applying, use a large fluffy brush to lightly dust over the skin for a natural finish that won’t look cakey or heavy.
The powder is essential in any makeup routine if you want your face to look flawless all day!
Applying Makeup With Brushes And Sponges
Choosing the right makeup brushes can be exhausting, so it’s important to know what type of brush is best for each product. Cleaning your makeup sponges and other makeup tools on a regular basis is critical to achieving a flawless look and preventing bacteria buildup. Applying makeup with brushes and sponges can help give you a professional finish, whether doing a full face or simply touching up.
Choosing Makeup Brushes
When applying makeup, the right tools make all the difference.
That’s why choosing makeup brushes is so important—it’s a decision that requires expert knowledge.
Makeup brushes come in many sizes, from fan-shaped to flat-topped or angled.
Depending on your desired look, you’ll want to focus on soft bristles made with natural materials like sable hair or synthetic fibers like nylon.
With an experienced eye and the right advice, you can find the perfect fit for any foundation, blush, powder, or eyeshadow!
Cleaning Brushes And Sponges
Now that you’ve got the perfect brushes and sponges for everyday makeup application, keeping them clean is essential.
After all, no one wants bacteria-ridden pencil eyeliner!
A few simple steps will help ensure your tools stay in top shape.
Use a mild soap or brush cleanser with lukewarm water to remove any excess makeup on the bristles and sponge surfaces.
Then rinse thoroughly —this is especially important when dealing with natural materials like sable hair.
Cleaning regularly ensures maximum performance every time you apply makeup!
Applying Makeup With Brushes And Sponges
Now that you know about cleaning and storing your brushes and sponges, it’s time to learn about applying makeup with them.
Brushes are great for the precision application of powders and creams while blending out harsh lines – they come in various sizes, so you can find the perfect one for each job!
Sponges work well with liquid products like foundation or concealer and give an airbrushed finish; just be sure to dampen first with water before dipping into the product.
Experimenting with different techniques will help you get the look you want every time. With practice, you’ll soon be a pro at using both brushes and sponges!
Skin Care For A Beautiful Base
Cleansing is the most critical step for a beautiful base, so make sure you’re using the right cleanser for your skin type and taking your time when you wash your face. Exfoliating once a week can help in removing dead skin cells and create a smooth base for makeup application. Moisturizing is vital to keeping your skin hydrated and supple, so moisturize twice daily for the best results!
Cleansing
Before you apply any makeup, cleaning your skin properly is essential. This removes dirt and bacteria that can lead to breakouts and irritation and helps create a smooth canvas for the rest of your beauty products.
A good cleanser should refresh your complexion while maintaining its natural balance. Start with a gentle product in the morning and evening – something like micellar water is perfect – then up the ante with an exfoliator once or twice a week to bring out your glow!
This will make all the difference when upping your makeup game; mascara and foundation will look much better on top of freshly-cleansed skin. Plus, you’ll have peace of mind knowing everything has been washed away, so you don’t need to worry about clogging pores or irritating sensitive areas.
Exfoliating
It’s time to focus on exfoliating as your skin is cleansed. This step helps remove dead skin cells and reveals the brighter, more even complexion underneath – perfect for a flawless makeup look!
Use an exfoliator with gentle beads or acids (like lactic acid) once a week; this will help encourage cell turnover and ensure you get all the benefits from your skincare routine. If your skin is too sensitive, opt for a milder exfoliator, like a clay-based scrub or enzymatic exfoliant, instead.
Following up with a moisturizer afterward is essential, as it’ll ensure your face feels hydrated without any dry patches that can interfere with makeup application. Makeup tips? Always use a soft touch when applying products over freshly-exfoliated skin – if you press down too hard, you risk irritating your delicate cheeks and forehead.
Moisturizing
Now that you’ve exfoliated your skin, it’s time to move on to moisturizing.
Moisturizing is essential for a beautiful and healthy complexion before applying makeup.
Not only does it help create an even canvas before makeup application, but it also helps keep the skin hydrated throughout the day.
When looking for a suitable moisturizer, consider your skin type; if you have oily or combination skin, opt for a lightweight formula with oil-controlling ingredients like witch hazel extract or tea tree oil.
If you have dry skin, look for something more hydrating – creamier formulas packed with nourishing oils (like avocado) are perfect choices!
For those who want extra guidance, check out some easy makeup tutorials online to learn how to apply the right amount of moisture onto your face without overdoing it.
Have fun experimenting!
Proper Makeup Removal
When it comes to proper makeup removal, gentle cleansers, and makeup remover tools are essential! It’s always recommended to use a gentle cleanser and a quality makeup remover tool to ensure your skin feels clean and hydrated.
Gentle Cleansers
Taking off your makeup is essential for keeping your skin healthy and glowing. You don’t want to sleep in all that mascara, concealer, and foundation!
The best way is gentle cleansers – look for ones specifically made for removing makeup that won’t strip away natural oils or cause irritation.
To make sure you get the benefits out of the product, use a soft facial brush or cotton pad soaked in cleanser when applying it; this will help remove stubborn traces of mascara and concealer from even the tiniest crevices of your brush.
Proper cleansing techniques ensure your skin stays fresh and vibrant – no matter how many products you put on during the day.
Makeup Remover Tools
Moving on to makeup remover tools, there are a few that you’ll need for successful removal.
An oil-based cleanser can be great for breaking down waterproof mascara and eyeliner; ensure it doesn’t leave your skin feeling too greasy afterward!
Cotton pads or rounds will also be helpful as they allow you to apply the product directly to the area of interest without the mess.
For stubborn pigments like dark lipsticks, use micellar water instead – this is specially formulated to quickly lift away heavy formulas.
Finally, don’t forget about facial brushes; this help reaches those hard-to-reach spots around the eyes and nose where mascara and eyeliner tend to accumulate.
You’ll have no trouble keeping your face clean and clear with the right products.

Creating A Smoky Eye Look
Creating a smoky eye look can be intimidating, but it can become second nature with the proper techniques and materials.
Creating the perfect smokey eye is like playing an instrument – you must practice to master it! Once you’re comfortable with your skill set, you can create a desirable smoky eye look in minutes.
Here are some tips that make this process easier:
• Use eyeshadow shades that complement each other; black and grey work together for a classic smoky eye.
• Blend the colors up towards your brow bone.
• Use eyeliner pencils or gel liners to define your lash line and add depth to your look.
• Don’t forget mascara – long lashes help complete any smoky eye look.
• Incorporate professional techniques, such as using tape on the outer corner of your lid when applying shadow for extra precision.
Celebrity makeup artists’ tricks can also help bring out the best in any smoky eye look.
From subtle hints of shimmer around the inner corners of the eyes to adding false lashes at the outer corners for drama, there are countless ways to experiment with creating a unique style.
With these expert tips, anyone can quickly achieve stunning looks within their homes – no expensive products required!
Natural Makeup For Everyday Wear
All you need is the perfect everyday makeup look to keep your face looking fresh! Natural makeup can help enhance your natural beauty without making it too dramatic or over-the-top.
This introductory tutorial will walk you through achieving an effortless yet polished everyday makeup look with minimal fuss and no harsh lines that scream, “I woke up like this.”
To begin, ensure your skin is prepped, moisturized, and primed to go smoothly when applying foundation, concealer, bronzer, or blush. A crucial part of achieving a nude/natural look is ensuring no stark differences in skin tones – blending everything well helps create the illusion of naked skin.
Use neutral colors for eyeshadows, such as beiges, browns, and gold, which give definition but remain subtle enough for everyday wear. Finish off with adding some mascara and tinted lip balm or lipstick if desired. You’ll have flawless-looking skin in minutes with just a few simple steps!
Choosing And Applying Bronzer
Bronzer has been a timeless beauty staple for many years, and it holds power to instantly enhance your makeup look. Imagine having access to all the secrets of how top makeup experts use bronzer – that’s what this guide is about!
From choosing the right shade for you to applying the product like an expert, let us be your go-to source. When selecting bronzer, consider which tone will best suit your skin type. Warm shades are ideal for medium to dark complexions, while cool tones flatter lighter hues.
When applying, keep in mind that less is more! A light dusting on the highest points of your face, such as cheekbones, forehead, and jawline, works wonders; for even results, blend out with a fluffy brush or sponge before adding highlight and contour into the mix. That way, you can achieve a stunning finish worthy of any red carpet-event!
Makeup Tips For Mature Skin
Makeup for mature skin is a unique challenge and needs to be treated with care. Fortunately, there are many ways to look your best without taking makeup courses or feeling overwhelmed by the introduction to makeup.
The important tip is to use a loose powder that helps even out the tone of your face while also helping keep your makeup in place all day.
Another thing you can do is find inspiration from celebrities who have similar features as yourself and copy their favorite looks! You don’t have to go overboard either; adding blush or lip color can make all the difference when making an impactful statement with your mature skin.
Confidence in your appearance will give you an excellent foundation for tackling any other makeup for beginners’ tasks.
Creating A Signature Look For Any Occasion
Creating a signature look for any occasion is essential to every makeup journey. With the right tools, techniques, and tips, it can be easy to create looks from natural glamour to full-on drama – all with just one little beauty kit!
Similar to how an artist uses their pallet of colors to create a masterpiece painting, your face becomes your canvas, and you get to play with various shades and textures.
To help make that special day even more memorable, here are some tips on creating a signature look:
• Preparing Your Skin:
• Cleanse your skin regularly with gentle cleansers or cleansing wipes to ensure your foundation goes smoothly.
• Moisturize daily with light or multi-purpose moisturizers as needed; this helps keep dryness away so your makeup doesn’t cake up during application.
• Glam It Up:
• Experiment with different matte bronzer techniques, such as smoky eyeshadow blending or contouring.
• Choose lipsticks and cheek stains based on what suits the occasion best — whether you go for bold reds or subtle nudes is totally up to you!
No matter where life takes you, these tips will surely come in handy when putting together those showstopping looks for whatever the event may be.
Conclusion
Applying makeup is an art form, and with the right tips and tricks, you can achieve a beautiful look that will help you feel confident in your skin.
Whether aiming for a subtle everyday look or something more glamorous for special occasions, it all starts with prepping your skin and choosing the proper foundation.
From there, concealing techniques, contouring, highlighting, and shaping brows are essential to creating your perfect base.
When it comes time to add color, bronzer is an excellent way to give yourself a sun-kissed glow while maintaining a natural appearance.
Finally, mature skin requires its own unique set of makeup tips to ensure that your look remains age appropriate yet flattering.
When I think about how far my skills have come since I first started experimenting with makeup years ago, I’m filled with pride over what I’ve been able to create!
Learning these beauty tips and tricks has opened up many possibilities for playing with different looks.
So don’t be afraid to experiment – whether trying new products or more complicated techniques like contouring – because practice makes perfect!
With enough patience and dedication, you’ll soon find yourself mastering this creative craft in no time!