Gel polish decorations are an excellent way for nail artists to express their creativity and take their skills to the next level. You can create stunning works of art on your fingernails or toenails with simple steps.
In this article, I’ll share all my tips and tricks as an experienced gel polish decoration expert so that you can easily create beautiful designs. You are not required to be a nail artist or have any previous experience in decorating nails successfully with gel polish.
All it takes is some patience, practice, and the right tools! By the end of this article, you’ll know exactly how to start creating amazing looks with your unique style. So let’s dive into these easy step-by-step instructions for crafting gorgeous gel polish decorations!
Getting Started With Gel Polish Art
Creating stunning works of art with gel polish is a craft that takes patience, skill, and practice. As the adage goes: ‘Practice makes perfect.’
To become an expert nail technician or artist, you must understand the fundamentals of applying gel manicures and creating intricate designs using various tools, such as nail art brushes and accent nails.
Creating beautiful pieces starts by correctly prepping your client’s natural nails before applying the base coat. This will ensure that any design or artwork created on top of this layer lasts longer than usual.
After cleansing the surface and pushing back cuticles, it’s time to select your favorite color palette! Choose colors that complement each other and different effects like glittery finishes or ombre shading techniques.
With these basics covered, you can begin crafting unique masterpieces at your fingertips everywhere.
Setting Up Your Space For Gel Polish Decorations
Now that you’re familiar with the basics of gel polish art and all its possibilities, it’s time to get ready for your first project. Setting up a comfortable space for yourself is essential for any nail artist getting started with gel nails. Here are some tips on how to prepare:
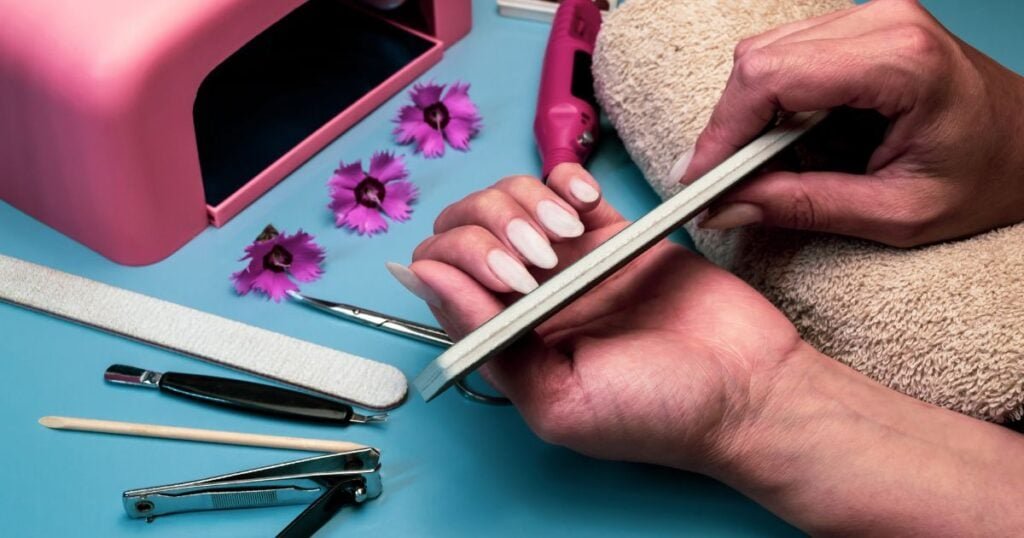
Gather Supplies:
• Gather all the necessary supplies, such as nail gel, nail tips, files, clippers, cuticle pusher, and other items needed, in one place and make sure they are within easy reach.
• Make sure you have enough colors of nail gels so that you can create interesting nail art designs!
Set Up Your Workstation:
• Have good lighting positioned above your workspace so that you can easily see what you’re working on.
• Use a flat surface like a table or desk to work on. Cover it with a vinyl tablecloth or paper towel if possible – this will make cleanup easier afterward!
• Put together everything else, including towels, wipes, and acetone remover nearby, before beginning your design.
Now that you have gathered the tools and set up your workspace, you can start creating beautiful works of art on those nails! With these steps in mind, even an amateur can become an expert at creating stunning manicures using gel polish techniques.
Choosing The Right Gel Polish For Your Design
When it comes to nail art, choosing the right gel polish is essential. This manicure requires a much longer-lasting finish than traditional polishes, so careful consideration must be taken when selecting your colors and products. While hundreds of different gel polishes are on the market today, they all have similar characteristics you should consider before deciding.
First, consider whether you’ll be using these nails for artificial or real nails–this will determine which types of base coats and topcoats work best for each type of nail.
Additionally, check if the polishes contain any ingredients that can cause an allergic reaction; some may also require special sealing tools to get them properly applied without air bubbles forming.
Finally, consider the application process: does this brand have easy instructions? Do certain colors need more layers than others? Doing a bit of research beforehand is always worth it!
Creating A Solid Base Coat For Gel Polish Art
Before you start your gel polish art, it’s important to properly prep your nails. Remove any old polish, shape and buff your nails, and clean them with an alcohol-based cleanser. Then, you can apply your base coat. Ensure you use thin, even strokes, and don’t forget the edges. Finally, pop your nails under the UV or LED lamp for the recommended time to cure the base coat.
Preparing The Nails
Before you start creating beautiful gel polish art, it’s important to prepare the nails.
Grab your cuticle stick and gently push back the cuticles around each nail.
Once that is done, wipe down each nail with a lint-free cloth or cotton ball saturated with acetone to remove oils from the nail’s surface.
This will ensure the base coat adheres properly so your designs won’t chip off easily.
Now you’re ready for some serious creativity!
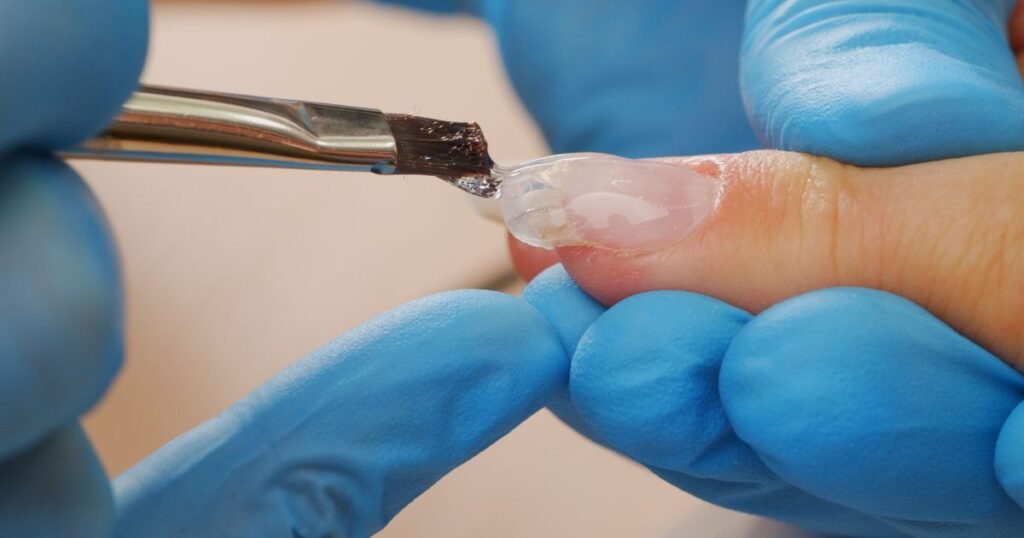
Applying A Base Coat
Now that your nails are ready, it’s time for the fun part!
As a nail artist, applying a base coat is one of the most important steps in creating beautiful gel polish art. This gives you something to work with as you create intricate designs on each nail.
To ensure that your base coat sticks well, use light strokes and ensure not overlap too much product onto the cuticles or skin around the nails. You want an even application across all ten digits, so take your time here.
When finished, remember to cure the basecoat under a UV or LED lamp before starting with any design work – this will help keep everything in place while you craft away like an expert!
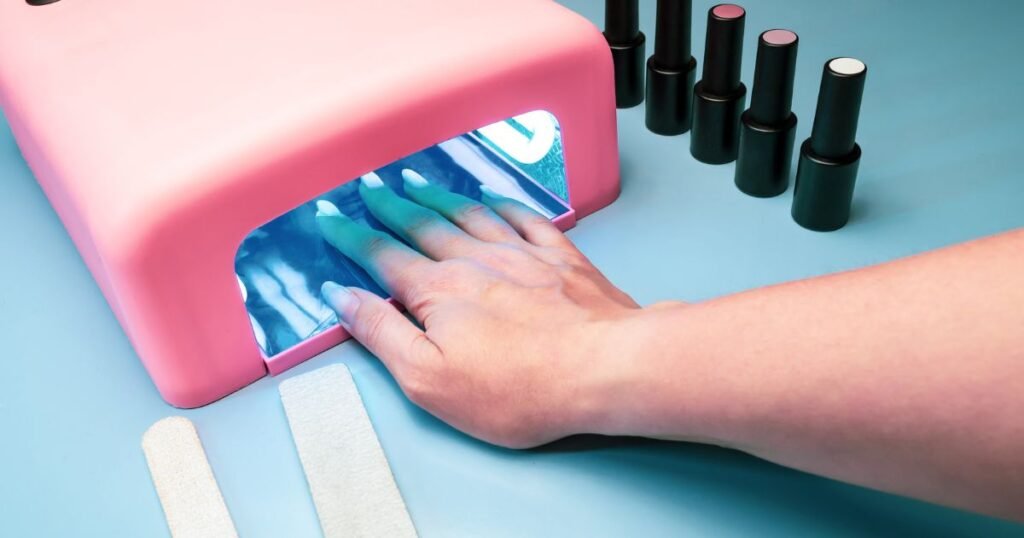
Curing The Base Coat
Once your base coat is applied, it’s essential to cure it for the product to stick. This is where a UV or LED lamp comes into play! Place each finger under the light and leave them there for 3-4 minutes – this will help ensure that everything stays put while you craft away like a pro.
After curing, use a cotton swab with nail glue remover to clean up any smudges around the cuticles and skin.
Now you’re ready to start creating those amazing gel polish designs!
Simple Decorations Using Gel Polish
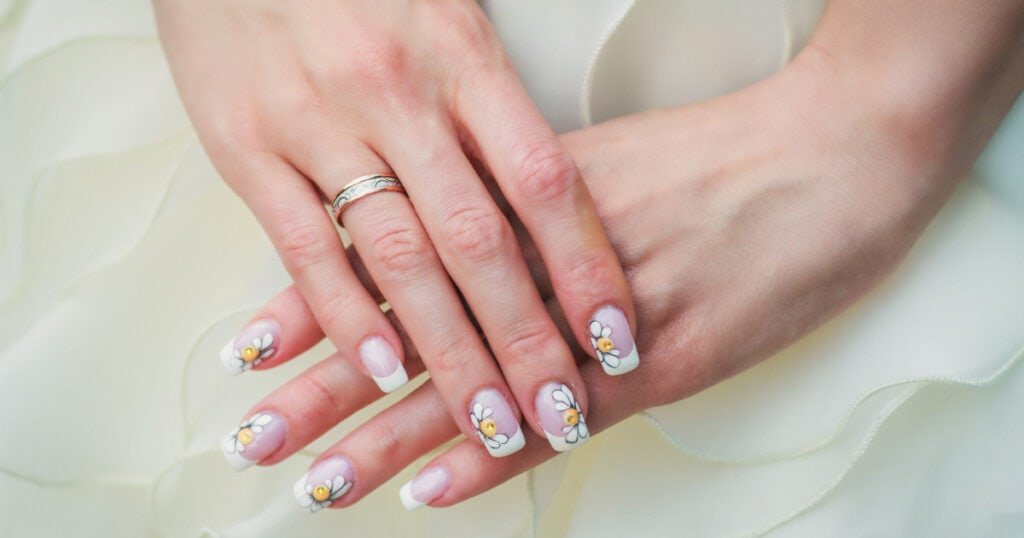
Creating beautiful gel nail designs is a skill that takes practice and patience. You can create stunning floral designs for your clients with the right supplies, creativity, and know-how! Here’s how to do it:
Firstly, start by selecting a few colors of quality nail paints. Opt for shades that will complement each other in whatever design you have chosen; this could be anything from classic reds and pinks to deep blues or neon greens.
Apply two layers of base color on all nails before beginning any intricate work. Once dry, use a thin brush dipped into one of the accent colors to paint petals around your client’s cuticles. Gradually add more petals as desired until your flower looks complete – don’t forget the center!
Finish with a top coat, and voila – an eye-catching manicure every time!
With these tips in hand, why not try your nail game today? Experiment freely with different color combinations and styles to determine what works best. You’ll soon perfect amazing gel nail art creations that will keep customers wanting more!
Using Stencils And Stamps To Add Detail
Stepping into a nail artist’s studio is like going to an enchanted garden. The colors, textures, and designs that can be created with gel polish decorations are truly remarkable – adding detail to the nails using stencils or stamps creates a unique masterpiece every time.
Adding detail to your work of art doesn’t have to be difficult for any nail artist! Here are a few tips:
• For detailed design, use thin stencils or adhesive vinyl placed on top of the nail before starting your manicure.
• When picking out stamping plates, look for ones with intricate patterns and shapes to help you create amazing nail art.
• Don’t forget about sponges – they’re great for creating gradients when applying multiple shades of color onto one nail.
• Experiment with different techniques, such as freehand painting and striping brushes, to add accents of color around the edges of each design.
• To finish your masterpiece, use glitters or rhinestones over the base coat of colored nail polish.
With these tools, any aspiring or experienced nail artist can easily create beautiful pieces that use all sorts of materials and techniques.
You’ll find yourself easily turning simple nails into works of art once you get used to working with stencils and stamps!
Adding Sparkle And Shine To Your Design
When it comes to gel polish decorations, adding a bit of sparkle and shine can make your nail art stand out. You’ll need some glittery or shimmery polishes specifically designed for gel polishes to achieve this effect.
These special glitters come in many colors and sizes – from tiny flecks to larger flakes – so you can customize the look to suit your design. Once you’ve chosen your favorite shades, apply them to cured base layers using a thin brush or dotting tool for maximum precision.
Keep each layer thin enough to allow light through; otherwise, all the sparkle won’t be visible! And there you have it: an eye-catching manicure guaranteed to turn heads!
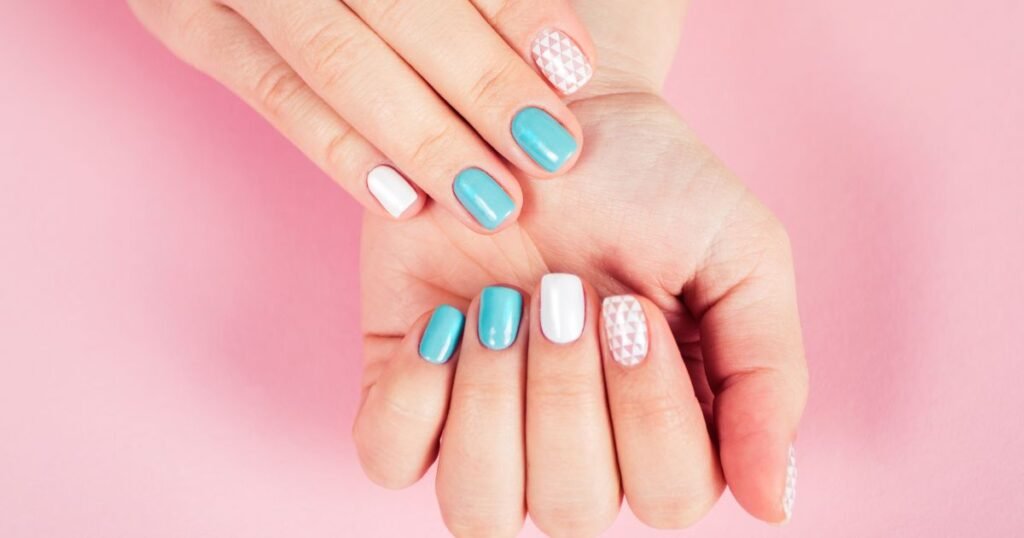
Blending Different Gel Polish Shades For A Gradient Effect
Adding sparkle and shine to your design with gel polish is a great way to express yourself through nail art. However, if you’re looking for something more subtle yet still stylish, blending different shades of gel polish can create an eye-catching gradient effect that will have people talking about your nails:
• Gel Polish Shades – Choose two or three gel polish colors in similar hues but slightly different tones to blend. To ensure the best results, pick out polishes that are designed specifically for use with one another.
• Application Process – Start by painting on the lightest shade at the bottom of each nail and then gradually add drops of the darker color onto it while wet. Use a brush to blend the colors without disturbing their shapes too much; this creates soft transitions between them. Finally, finish off with a top coat to seal in the look!
• Creative Ideas – Enjoy experimenting and creating unique looks using vibrant, bright, or muted pastel combinations. You could even try adding glitter over certain areas for added dimension! The possibilities are endless for crafting DIY nail art with gel polish.
With simple steps and creativity, you can easily achieve beautiful results every time – perfect for any occasion!
Adding Metallic Effects To Gel Polish Art
Metallic effects are the perfect way to take your DIY nail art design from ordinary to extraordinary!
With a few simple steps and some uv nail polish gel, you can create stunning color nail polish looks that will have everyone admiring your unique style.
Start by prepping your nails with a clear or nude-colored polish base coat.
Next, apply two thin coats of metallic polish over the entire nail surface.
Add small pieces of glitter or sparkles along the sides for an extra special touch – this will make your polished nails stand out even more!
To finish off your look, add a sealant topcoat so that it lasts longer.
No matter what type of manicure you choose, ensuring you have all the supplies necessary for creating beautiful nail art decorations is essential.
You’ll need different types of polishes, like dotting tools and tweezers for intricate detailing work, and acrylic paints for any custom artwork designs you want to include.
With these items, you’re ready to let your creative juices flow and create amazing one-of-a-kind masterpieces at your fingertips!
Incorporating Foil Into Your Design
Bringing a touch of glamour and sophistication to your gel polish decorations has never been easier! Incorporating foil into your design is the perfect way to add a level of luxury that will take your nail art look from ordinary to extraordinary.
Not only does it provide an eye-catching finish, but it also adds texture and depth for alluring results every time.
Here’s how you can create stunning DIY nail designs with foil:
• Preparing Your Nails:
• Begin by prepping nails as normal by shaping them and pushing back cuticles.
• Then apply a clear base coat for added protection against chipping.
• Applying foil:
• Cut small pieces of foil in unique shapes and sizes according to preference.
• Carefully place each piece onto dry manicure nails with tweezers before pressing lightly until secure.
• Follow up with an additional topcoat to keep foil securely in place while adding extra shine.
With just these few simple steps, you can show off truly dazzling looks using nothing more than some basic supplies, such as nail polish and foil.
Create captivating patterns or use complementary colors like silver, gold, blue, or pink – let your imagination run wild! Whether you’re looking for something subtle or making a bold statement, there’s no limit when it comes to mastering the art of creating beautiful manicures with foil.
Creating Ombré Effects With Gel Polish
Creating ombré effects with gel polish is a great way for nail artists to get creative and add flair to their client’s nails.
Whether you’re working at a nail salon or doing DIY nail gel from the comfort of your home, an array of options are available for creating beautiful color combinations.
Various colors can be used on natural or acrylic nails, so feel free to experiment with different shades and hues!
The trick to creating stunning ombré designs lies in blending several colors.
Start by choosing two colors that complement each other well; one should be slightly darker than the other for a subtle transition between the two shades.
Once you’ve applied both colors onto the nails, gently blend them with a sponge or brush until they create an even gradient effect.
You’ll soon become an expert at making beautiful ombré designs with practice!
Adding Texture To Polish Gel Decorations
Adding texture to gel polish decorations is an art form that requires creativity and finesse. Like a painter’s brush, the nail artist can use textures to give their work of art dimension, making it come alive with every stroke.
To get started with textured nail art, here are three key points to remember:
• Use high-quality tools like dotting tools and sponges for the best results;
• Experiment with different techniques, such as dragging or dabbing your tool to create unique designs;
• Incorporate glitters and foils into your manicure for extra shine and glamour.
Through practice and patience, any nail artist can master texturing gel polishes in no time! With each new technique, bring out more personality in your artwork – you’ll surely delight clients with intricate details they never knew were possible when working with gels!
Negative Space Techniques In Gel Polish Art
As a nail artist and manicurist, I know that negative space techniques can add something special to any gel polish art design. Negative space is simply the “empty” area of your nail bed – the parts of your nails not covered in polish or decoration. With some practice, you can use these areas to create stunning designs with your gel polishes!
When creating an intricate look with negative space techniques, it’s important to start by picking a color scheme for your manicure. Play around until you find one that works for you!
Once you have chosen your colors, carefully apply them on each nail in thin layers. When applying the gel polish, leave enough room between each stroke to avoid overlapping lines in the finished product.
Finally, take extra time cleaning up around the edges, as this will ensure a neat finish and help bring out all those beautiful details within your design.
Intricate Gel Polish Art Techniques
Creating elaborate and intricate gel polish designs can be like painting a masterpiece – you just need the right tools, patience, and skill. With these assets, nail artists can craft highly detailed works that will leave clients with long-lasting vibrant art on their nails.
To begin your journey into creating fine art for nails, start by finding the perfect manicure plate for nail art – this is where the magic begins!
After selecting your desired mold design, it’s time to choose from an array of colors; make sure to select both brighter hues as well as subtle shades, so you have plenty of options when designing your artwork:
1. Fake Nails – Create a canvas with fake nails if wanting longer lengths for more intricate decorations.
2. Glitter Polish – Add sparkle and shine to any design using glitter polishes or powders.
3. Manicure Effect Nail Lacquers – Use special effect lacquers such as crackle, magnetic, and glitters over regular nail polishes to add texture and drama to existing designs.
With all these elements combined, one can create beautiful pieces that demonstrate precision and finesse – allowing them to stand out among other professional nail salons!
Finishing Touches For Polish Gel Decorations
As a nail artist, you want to ensure your gel polish decorations last and look their best. That’s why reviewing the basics of finishing touches for any gel decoration project is important.
First, assess whether you need to add stickers or additional design accents with your chosen polishes. If so, give them time to dry completely before applying the top coat.
After this step is complete, use a thin layer of clear-coat polish on nails that already have designs—this will help preserve the art and protect from chips or loss of color.
Once done with this process, finish by adding another layer of clear coat which seals in all the details and helps maintain the vibrancy of colors used in the overall design.
The key takeaway here: always remember to take extra care when doing those final steps! When done correctly, they’ll ensure lasting beauty in every one of your amazing works of nail art!
Caring For Gel Polish Art
As a nail artist, it’s important to take proper care of your gel polish art once you are done.
To ensure your creations’ longevity and vibrancy, hydrate the cuticle with a good quality cuticle oil. This will help prevent cracking or peeling, keeping those beautiful designs looking sharp for longer!
For best results, use cotton pads when applying the hydrating oil, as they allow you to cover all areas evenly while preventing any potential messes from occurring.
Taking these steps after each manicure can drastically improve how long your nail art looks great!
As a bonus, this also helps keep your hands feeling soft and nourished.
Removing Gel Polish Decorations
The art of gel polish decoration is a delicate ballet across the canvas of your fingertips. It’s an experience that allows you to discover and express yourself with every stroke, creating personalized designs just for you!
But what happens when it’s time to remove those designs?
When it comes to removing your favorite creations, several different methods depending on which type of products were used:
• Nail Lacquers Kit – Betina Goldstein products can be easily removed by soaking cotton balls in acetone-free nail polish remover, then wrapping them around each finger and covering them with aluminum foil for 10 minutes.
• Dip Powder Nail Kit – DIY Manicure Nail Salon kits require no additional effort since the color will come off after filing the layers using a buffer block.
• Nail Polish Gel Decor – You must use an electric drill or file specifically designed for gel polish removal for these intricate decorations. This process involves gently grinding away at each layer until all the product is gone.
No matter what technique you choose, ensure you take extra care not to damage your nails, as they become more brittle during this process. You can learn how to easily remove gel polish decorations with patience and practice!
Troubleshooting Gel Polish Problems
As nail artists, we all know that there are times when troubleshooting gel polish problems can be a challenge. We must use our training and hours of practice to develop creative solutions for the issues that arise.
For example, if you’re applying French manicure or butterfly stickers and find they aren’t adhering correctly, try using a thicker layer of a top coat than usual. This will help lock them in place without risking potential smudging from thin coats being applied too quickly.
For any problem encountered during the application, it’s always best to take a step back and look at it from another angle. If your client has requested something more intricate than what you’ve tried before, research how other nail artists approach their design work – often, this can provide new ideas on tackling tricky designs or challenging motifs!
Even complex gel polishes can be easily created with the right knowledge and techniques.
Advanced Techniques For Experienced Nail Artists
For experienced nail artists, the possibilities for gel polish decorations are virtually limitless. Like a painter with their canvas, you can use adhesive nails, DIY nail art kits, and more to create stunning works of art at your clients’ fingertips!
Whether it’s a special occasion manicure or something as simple as a gradient design using multiple shades of gel nail polish, the sky is the limit when creating beautiful designs. From intricate floral patterns to geometric shapes and abstract designs, there is no shortage of ideas for even the most discerning tastes.
You can easily turn any client’s vision into reality with basic supplies, such as topcoat sealers and specialty tools. Mix colors and layering techniques to give each design its unique flair. So don your artist hat, break out the nail polish, and let your imagination run wild!
Showcase Your Polish Gel Decorations In Social Media To Gain More Customers
As an experienced nail artist, you now know some advanced techniques to create beautiful gel polish decorations. It’s time to improve your skills and show off your work on social media!
It’s fun and can be a great way to attract more customers for your beauty salon or freelance business.
You could share images of clients’ nails with intricate designs or post step-by-step tutorials on how to use pastel shades, polka dots, and bright colors. Encourage people to comment and interact by asking them questions like: ‘Which design do you prefer?’ or ‘Can you guess what shade this is?’.
This may help get more eyes on your work and build relationships with potential clients already familiar with your brand.
Remember that consistency is key when promoting yourself online – make sure all posts match each other visually so that people easily recognize they come from the same place.
With enough effort and creativity, you’ll soon see results!
Conclusion
The art of gel polish decorations is truly a fascinating one. It’s like transforming a blank canvas into something beautiful with the right materials and techniques.
Every nail artist has a unique style, but I believe that no matter their level, they can create stunning works of art with gel polishes.
Practice makes perfect when mastering this form of creative expression! With patience and dedication, anyone can learn how to make intricate designs with just a few simple steps.
As an experienced nail artist, I am constantly inspired by new ideas and gel polish methods. The possibilities are endless – from subtle details to bold statement pieces – you can let your imagination run wild when creating these amazing manicures.
Like any skill worth having, becoming a master of gel polish decoration takes time and dedication. However, the rewards for all your hard work will be worth it!
Once you have perfected your craft, nothing will stop you from expressing yourself in any way you choose through colorful and eye-catching designs on nails everywhere!